Unreal Engine 소스 코드 받기
Unreal Engine 소스 코드 받기는 다음 페이지 참고하여 GitHub에서 받습니다.
https://docs.unrealengine.com/5.1/ko/downloading-unreal-engine-source-code/
언리얼 엔진 소스 코드 내려받기
소스 코드 저장소에 접속하여 언리얼 엔진 최신 빌드를 다운로드하는 법에 대한 단계별 안내입니다.
docs.unrealengine.com
Unreal Engine 빌드 설정 및 빌드하기
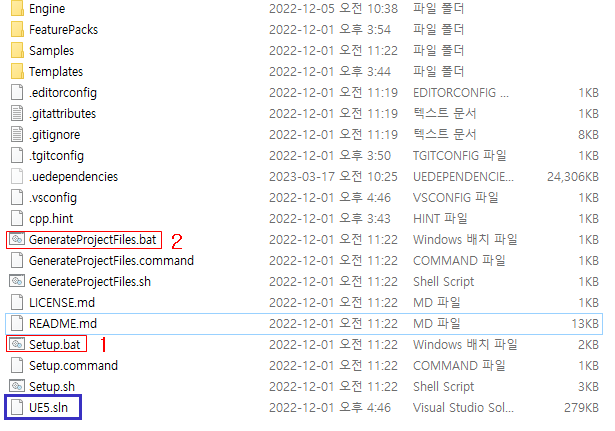
Unreal Engine 소스 코드를 모두 받으면 순차적으로 배치 파일들을 실행합니다.
- Setup.bat 파일 실행
- GenerateProjectFiles.bat 파일 실행
실행을 마치고 나면 UE5.sln 파일이 생성 됩니다.
솔루션 파일을 열어서 빌드를 해봅시다. 반나절 이상 걸리니... 마음의 준비를 하고 빌드 하시길~.
Unreal Engine 레지스터리 등록
엔진 홈 디렉토리에서 다음의 스크립트를 실행하여 "MyUnrealEngine"이라는 이름으로 등록합니다.
이 이름은 원하는 이름으로 수정해도 됩니다.
reg add "HKEY_CURRENT_USER\Software\Epic Games\Unreal Engine\Builds" /v "MyUnrealEngine" /t REG_SZ /d "%CD%" /fuproject 파일을 우클릭하여 엔진 스위치를 하면 방금 등록한 소스 엔진이 보이며 스위치하여 이 엔진을 사용 하도록 할 수 있습니다.

배포(Deploy)를 위한 엔진 바이너리 구성하기
소스 엔진에서 배포를 위한 파일들을 일일이 찾아 내서 배포 엔진 바이너리를 구성하는 것은 사실상 불가능에 가깝습니다.
때문에 Unreal Engine은 Installed Build라는 이름으로 이를 자동으로 해주는 툴을 제공하고 있습니다.
이 툴을 사용하면 손쉽게 최적화된 엔진 빌드를 추출할 수 있습니다.
https://docs.unrealengine.com/4.26/ko/ProductionPipelines/DeployingTheEngine/UsinganInstalledBuild/
설치 빌드 사용
Installed Build 프로세스와 그 스크립트를 작성하는 법에 대한 개요입니다.
docs.unrealengine.com
BuildGraph 스크립트 시스템과 [UERoot]/Engine/Build/InstalledBuild.xml 에 위치한 설치 빌드 스크립트를 사용하여 설치 빌드를 만들 수 있습니다.
설치 빌드를 만드는 방법입니다.
- 다음 명령으로 AutomationTool (자동화 툴)을 호출하여 설치 빌드 스크립트를 실행합니다. [PLATFORM] 은 Win64 또는 Mac 으로 대체합니다.
- BuildGraph -target="Make Installed Build [PLATFORM]" -script=Engine/Build/InstalledEngineBuild.xml -clean
- 언리얼 엔진 디렉터리의 LocalBuilds/Engine/ 폴더로 이동하여 생성된 설치 빌드를 확인합니다. 퍼블리싱 디렉터리를 다른 곳으로 지정한 경우, 그 디렉터리로 이동합니다.
BuildGraph는 RunUAT.bat 파일을 실행하여 수행하며 다음은 명령 실행의 예입니다. 프로젝트의 상황에 맞게 명령어를 수정해야 겠습니다. [UERoot]\Engine\Build\BatchFiles 폴더로 이동한 다음 실행합니다.
"-set:" 파라미터에 형태로 설정하는 것들이 많으며 각각의 의미를 알고 프로젝트 특성에 맞게 설정하여 실행해야 겠습니다.
RunUAT.bat BuildGraph -target="Make Installed Build Win64" -script=Engine/Build/InstalledEngineBuild.xml -set:WithWin64=true -set:WithMac=false -set:WithAndroid=false -set:WithIOS=false -set:WithTVOS=false -set:WithLinux=false -set:WithLinuxArm64=false -set:WithClient=true -set:WithServer=true
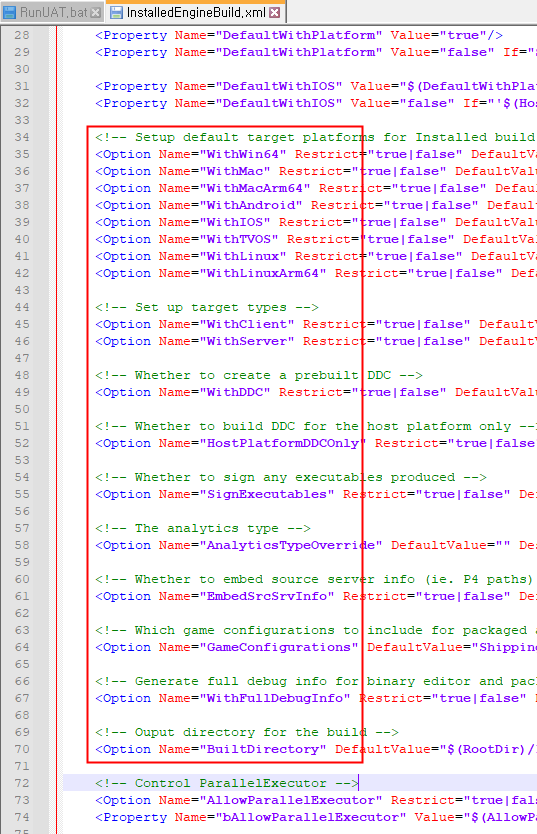
[UERoot]\Engine\Build\InstalledEngineBuild.xml 파일을 열어 봅시다.
다음에서 옵션으로 되어 있는 것이 -set: 으로 넘길 수 있는 모든 옵션입니다.
그 의미 또한 주석으로 되어 있어서 살펴 보면서 프로젝트에 적합하게 설정합니다.
GameConfigurations 설정을 예로 설명하겠습니다.

GameConfigurations 옵션으로 Default값으로 "Shipping;Development;DebugGame"으로 되어 있습니다.
DebugGame의 경우 프로그래머가 아니면 필요없으므로 이를 엔진 배포 빌드에서 제외 시킬 수 있습니다.
다음과 같이 설정 값을 set해주면 DebugGame은 빠지겠죠.
-set:GameConfigurations=Development;Shipping배치파일 실행이 모두 정상적으로 되었다면 LocalBuilds 폴더가 생겨 있는 것을 보실 수 있습니다.

최적화 되어 추출된 Unreal Engine 배포 빌드를 다음과 같이 확인 하실 수 있습니다.


Windows 폴더를 배포를 하면 다른 작업들이 Custom Unreal Engine을 사용할 수 있습니다.
앞에서 설명 했던것 처럼 엔진을 레지스트하고 스위치하는 과정도 해줘야 겠죠.
이 밖에 참고 글,
https://edwardbeazer.com/unreal-installed-builds-rocket-buids
Unreal Installed Builds(Rocket Buids) - Edward Beazer Blog
Installed builds(use to be called Rocket builds) are a compiled version of the Engine. For example, when you download an engine version from the Epic Launcher, its actually an Installed build. The main reason you would want to make an installed build is to
edwardbeazer.com
How To build the Unreal Editor (GitHub) | Community tutorial
A step by step guide to building Unreal Engine from source code using GitHub.
dev.epicgames.com
참고 하면 좋은 영상,
https://www.youtube.com/watch?v=YX85Z57_T0k
'게임 개발 > Unreal Engine' 카테고리의 다른 글
| [UE5] 버추얼 섀도우 맵 (0) | 2023.03.22 |
|---|---|
| [UE5] 나나이트 사용하기 (0) | 2023.03.22 |
| [UE5] 모션 매칭(Motion Matching) 설정 (1) | 2023.03.14 |
| [Unreal Engine] 콘솔 커맨드 제작 방법 (Console Command) (0) | 2023.03.07 |
| [UE5] 모션 매칭(Motion Matching) (0) | 2023.03.01 |